Unleash your content builder with these Visual Composer Tips
With Visual Composer you can create good-looking, and if you invest a lot of time, amazing looking websites with only some basic knowledge of HTML or CSS. For simple tasks you can avoid to write code altogether. However, I found it tedious to search for everything online because the documentation is so scattered across the internet. Therefore I have compiled a list of Visual Composer tips that might help you get more out of Visual Composer.
1. How to get a Custom Font for Visual Composer
You might have realised that you can’t change the font in your standard text element. Actually you can but it can end in a laborious task which involves code and sometimes a slight modification of your theme or plugin.
There are however 2 easy solutions:
- You can use the Visual Composer (VC) element “Custom Heading”
- Or you can use the Ultimate Addons element “Heading” AND Ultimate Addons element “Google Fonts manager” to import Google Fonts
Examples:
I. This custom heading element is using Google font Handlee.
2. How to do internal Page Jumps
If you like to place a link with Visual Composer that points to somewhere further down the page you don’t need a lot of HTML knowledge. Just the basic syntax is enough.
- Use the insert link feature as you normally would in WordPress
- Instead of writing a URL in the URL filed write # + a unique name or Element ID, e.g. #ingredients You can’t use the same name twice as unique ID.
- Go to the visual composer element to which you want to point or jump to and edit it.
- On the first tab you should find ‘Element ID’. Enter here your unique identifier without #. If we use the example from above it would be ingredients
- Working example: Click on Page Jumps in the heading. It will bring you to the next heading.
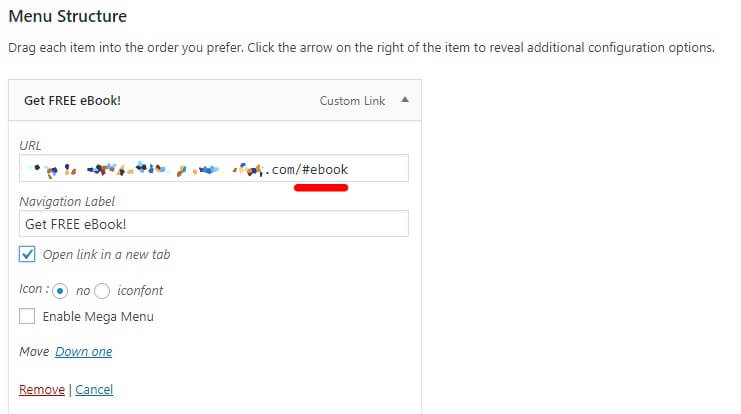
3. How to do page jumps from menu
You can also do page jumps from the WordPress Menu. All you need to do is to specify the row ID in your VC Element without the hashtag and in the menu options you add ‘#your_row_name’ behind the URL in the custom link section. That’s all.
Example:


